 Recent Blue Posts
 Hotfixes: April 16, 2024
 Season of Discovery Hotfixes - 16 April
 May be stop wasting resoures on experiments?
 Rank the Dragonflight Dungeons (beyond knee-jerk reactions)
 MMO-Champion


Disclaimer: This guide will only cover changes up to and including those included in patch 7.2. It does not include Tomb of Sargeras content, to include Tier 20, new trinkets, or as of yet unforeseen balance passes, so please don't ask about them.
Disclaimer: This guide will largely serve as a sequel to the previous 7.1.5 guide, some information will be duplicated, while outdated information will be removed. If you're looking for information which is no longer supported, check back there. Likewise, if you're a beginner looking for guides which give a more comprehensisve overview of the class and all it's different capabilities, I suggest checking my Wowhead or Icy-Veins guides.
Be part of the team, join the Warrior Discord today!
Quicklinks: FAQ - Rotations - Stats - Class Campaign and Order Hall Optimization - Artifact Challenge/Mage Tower
FAQ
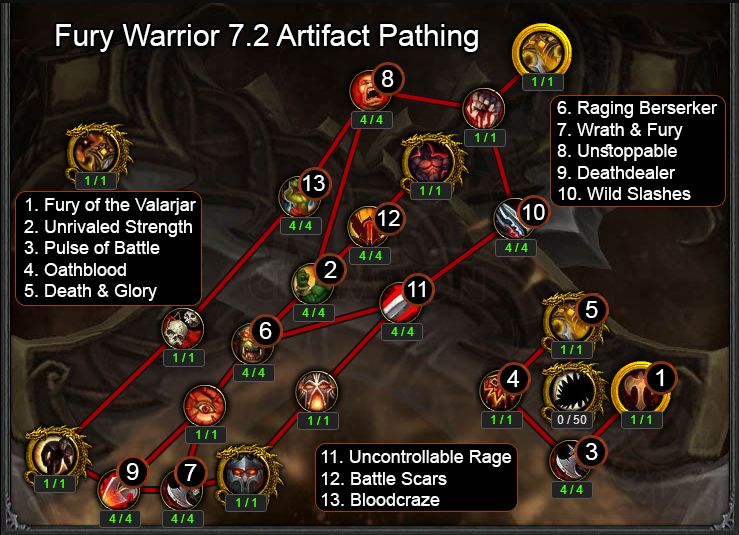
"What's the 7.2 artifact path?"
"How do the new traits work?"
Spoiler:
- Pulse of Battle generates 4 rage per critical strike with Raging Blow. Since Raging Blow attacks and can crit independently with each hand, it can generate up to 4-8 rage per crit, and has a greater overall chance for at least one hand to crit. For the mathy types, this means a 10% chance to crit converts to a 19% chance for at least one hand to crit (4 rage), and a 1% chance to crit with both (8 rage).
- Oathblood has a 10% chance to trigger an extra Bloodthirst attack after Bloodthirst is used. It's completely automatic, the damage is rolled separately, generates rage, and has its own chance to crit, which can trigger Enrage.
- Death and Glory causes Odyn's Fury to deal extra Fire (Odyn's Glory) or Shadow (Helya's Scorn) damage (300% attack power - roughly 50% of OF's direct/non-DoT damage), and either generate 20 rage (Fire) or leech for damage dealt (Shadow).
- Concordance of the Legionfall is the new dump trait, which requires all other traits to be obtained first. It's a 10s duration, 1.37 RPPM, Strength increasing proc.
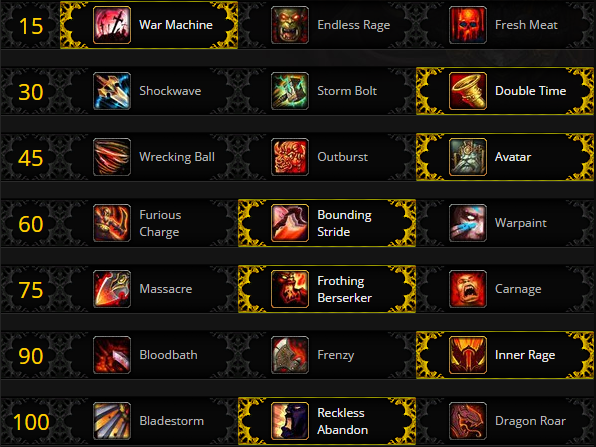
"What are the best talents?"
Spoiler:
"What about other talents?"
Spoiler:
- Endless Rage should be used on single target fights, while War Machine is better for any fight which grants at least 30% uptime. For Nighthold these fights are typically Skorpyon, ChronAnom, Spellblade, Tichondrius, Botanist, and Gul'dan. It's also useful for most dungeon and open world content.
- Wrecking Ball is only worth using if you're consistently using Whirlwind outside of cooldowns.
- Bloodbath and Frenzy perform similarly to Inner Rage in a static environment, but Inner Rage is much more versatile, and tends to perform much better in actual encounters, especially those with intermittent multi-target, movement, or downtime during the encounter.
- Massacre and Carnage are outperformed by Frothing Berserker.
- Bladestorm doesn't perform well due to not fitting into cooldowns and being supplanted by Odyn's Fury. Dragon Roar is completely outclassed by Reckless Abandon.
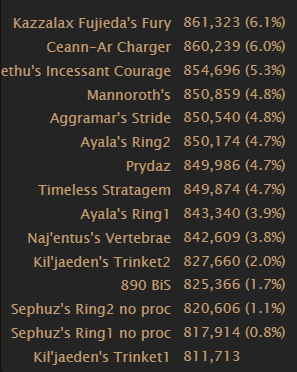
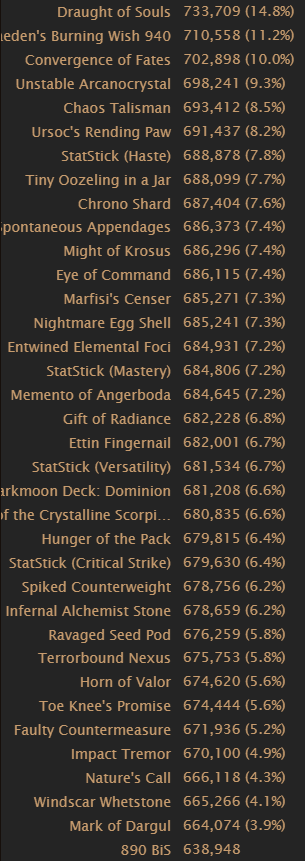
"Is there a BiS list?"
Spoiler:
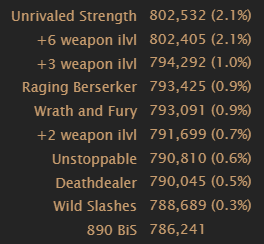
"What are the best legendaries?"
Spoiler:
Rankings use 890 ilvl BiS list (see above) as a base, with 4p tier, all new 7.2 traits, and a variance of +/- ~600 dps.
Notes for use
- There are two different ring and trinket slots in the BiS list, ergo Ring1/Trinket1 means the legendary replaces the item in Ring/Trinket slot 1 (the top slot), and Ring2/Trinket2 replace the Ring/Trinket in slot 2 - reference the BiS list above.
- Ceann-Ar, Kazzalax, and Stratagem use Tier legs to maintain the 4p bonus.
- Sephuz's doesn't account for the proc, if it can be reliably procced it dramatically increases in value.
- Naj'entus's and Kil'jaeden's are ranked with only one target. If used against multiple targets their values increase proportionately.
- With Kazzalax, Bloodthirst can be used on the pull immediately before Battle Cry.
- With Ayala's, Execute should be used during Raging Blow's cooldown, in place of a weaker Bloodthirst/Furious Slash.
- Kil'jaeden's should be used during Battle Cry, preferably against multiple targets. It's not affected by Avatar or Enrage and already automatically crits, but does benefit from Unrivaled Strength (which is actually a bug, though not one that will be fixed). While strong due to ilvl, it's weaker than Draught/Convergence.
- Ceann is actually slightly better than Kazzalax in practice, since you're not required to maintain the stacking buff.
- While Ceann and Kazzalax are effectively tied for BiS, they're typically not the best together, since it forces using the poorly itemized tier chest. When using one, replacing your worst epic with a non-tier legendary tends to be a better setup.
"What are the best trinkets?"
Spoiler:Draught of Souls and Convergence of Fates.
Single trinket - using BiS list above, minus trinkets.
"What are the best Relic traits?"
Spoiler:Battle Cry, Enrage, and Raging Blow.
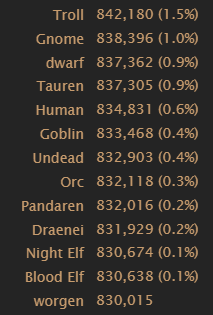
"What's the best race?"
Spoiler:They're close enough not to make a significant difference, but if you really want to spend money (gold)...
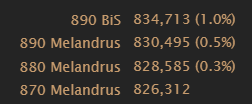
"Is Jeweled Signet of Melandrus (auto-attack ring) still good"?
Spoiler:Yes, though not as good as it used to be, as Critical Strike is continually devalued in relation to Haste & Mastery and ability damage now makes up a larger part of total damage.
As an example of relative strength, here are comparisons of various ilvl Melandrus vs BiS Nighthold rings:
vs 890 Scoured Clan (Haste/Mastery)
vs 890 Braided Stems (Haste/Versatility)
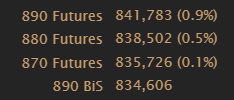
"What about Ring of Collapsing Futures?"
Spoiler:BiS at a competitive ilvl, though the proc only affects a single target, making it weaker in multi-target situations. It should be used during Battle Cry and Enrage, whenever the Temptation debuff isn't up.
As an example of relative strength, here are comparisons of various ilvl Collapsing Futures vs BiS Nighthold rings:
vs 890 Scoured Clan (Haste/Mastery)
vs 890 Braided Stems (Haste/Versatility)
"Is Draught getting nerfed?"
Spoiler:No, though it wouldn't be surprising if it is by the time Tomb releases.
"Isn't it pronounced 'Draft'?"
Spoiler:I really don't care.
"If I have prot legendaries, exactly 18.63784 Haste, macro Fishbrul with Prolonged Power, keybind Bloodthirst to an unlocked mousewheel, and my cat refuses to coach me anymore, what will AMR say my best in bags is?"
Spoiler:If you want me to answer overly specific questions like this, become a Patron.
Rotations
Note: > means "greater than", not "and then". This means it's a priority list, not a step-by-step sequence.
Note: -> means "and then", not "greater than". This means it's a step-by-step sequence, not a priority list.
New in 7.2
- The new traits don't impact the rotation much. While Death and Glory makes Odyn's Fury stronger, it's still better used after Raging Blow, in place of Furious Slash or Bloodthirst.
- Massacre rotations will no longer be listed, they can be found in the 7.1.5 guide.
Frothing Berserker
Spoiler:
Normal rotation
- Raging Blow (if Enraged) > Rampage (100 rage) > Raging Blow > Bloodthirst > Furious Slash
Only use Rampage with 100 rage once the Frothing Berserker buff is up, regardless if you're already Enraged or not.
Cooldown rotation
- Rampage (100 rage from RA) > Raging Blow > Odyn's Fury > Bloodthirst > Furious Slash
Rampage can be used prior to Battle Cry even with less than 100 rage, to minimize rage waste, since Battle Cry will proc Frothing anyway. However, you should not delay Battle Cry to ensure this happens.
See the Draught of Souls section below for information regarding trinket use.
- Ramp -> RB -> OF -> BT -> RB -> FS -> BT -> RB
Increased rage generation from 7.2 traits (Pulse of Battle/Odyn's Glory) can generate enough rage to allow Rampage to be used a second time during Battle Cry, it should be used at the end of Battle Cry, in place of Furious Slash/Bloodthirst. With over 50% haste, through War Machine/etc you'll be able to fit a third Raging Blow.
Execute rotation
Best for short Execute phases, wherein the target is expected to die within a few GCDs, valuing the direct damage of Raging Blow over maintaining Enrage/Frothing Berserker.
- Execute > Raging Blow > Bloodthirst
Juggling Frothing Berserker during Execute - Requires Tier 19
Good for longer Execute phases (raid bosses), this rotation is good for maintaining Enrage and Frothing Berserker, though requires a keen sense of timing and buff tracking. Ideally, you want to go into the Execute phase at, or as close as possible to, 100 rage and then rotate:
- Execute -> Furious Slash -> Bloodthirst
The idea is to use Execute to drop rage below 100, use Furious Slash to buff Bloodthirst, and then Bloodthirst to generate rage and proc Enrage. Ideally, this will push you back up to 100 rage, however it isn't entirely reliable due to variations in the swing timer; sometimes you won't proc Enrage, sometimes you'll end up at 98 rage instead of 100, etc. Either way, you still continue the rotation by using Execute again, even if Enrage or Frothing are not active. Since Enrage and Frothing Berserker last long enough to cover two cycles, even if they don't proc every time, they should be up more often than not.
When Battle Cry has 10-15s remaining, abandon this rotation and simply spam Execute to drop rage, before using Battle Cry to generate more.
Execute Cooldown rotation
- Battle Cry > Bloodthirst (if not enraged) > Execute
Using Battle Cry will generate 100 rage and proc Frothing Berserker, Bloodthirst will proc Enrage if it's not already up, and then spam Execute. Use Bloodthirst to apply Enrage when the buff is down. Odyn's Fury should only be used with <6 stacks of Juggernaut, and if the target is expected to die quickly.
Optional: If the Taste for Blood buff is up, Bloodthirst can be used before Battle Cry, to save having to use Bloodthirst on the first GCD of Battle Cry.
"Should I use Whirlwind instead of Furious Slash during Battle Cry?"
Spoiler:No; it's inconsistent and the potential gain isn't worth the potential loss. If you could ensure that the Bloodthirst following the Whirlwind replacing your Furious Slash would happen before Battle Cry falls off (ensuring the Bloodthirst auto-crits), then it would be a gain; but if it doesn't, it's a loss due to missing out on the +30% chance to crit. At the same time Whirlwind doesn't deal all of its damage at once due to being split up into three "spins", so it's always possible for some of the damage to fall out of the buffs anyway. Overall, it's an extremely small optimization which requires forward thinking and split second timing; it just isn't worth it.
Multi-target
Spoiler:
Normal rotation applies, replacing abilities with Whirlwind based on target count.
Two targets
- Whirlwind before Rampage to cleave it.
Three targets
- Whirlwind in place of Furious Slash, and in place of Raging Blow if you have Naj'entus's Vertebrae.
Four targets
- Whirlwind in place of Furious Slash and Raging Blow.
Eight+ targets
- Whirlwind in place of Bloodthirst, Furious Slash, and Raging Blow; continue to use Rampage (only at 100 rage with Frothing Berserker).
Using Draught of Souls
Spoiler:Use during Battle Cry, Avatar, and while Enraged. The effect lasts three seconds, does not interrupt Rampage, and you cannot use abilities, but will continue to auto-attack and generate rage during the effect, which is why Rampage should be used to trigger Enrage rather than Bloodthirst.
Opener with 4p
- BC+Ramp -> Draught -> RB -> BT -> OF
You need Lust or an unfeasible amount of Haste to fit OF.
Opener without 4p
- BC+Ramp -> Draught -> BT -> RB -> OF
The only difference here is that Enrage will not last long enough to cover Raging Blow, so Bloodthirst is used first. You need Lust or an unfeasible amount of Haste to fit OF.
Without Lust
- You won't fit Odyn's Fury without a Haste buff, and should instead save it till the next Battle Cry (with Convergence), or use it in place of an FS while Enraged/Frothing (without Convergence), then go back to using it with Battle Cry as normal. This ends up delaying overall OF use, but increases the overall number of Raging Blows and reduces the use of Furious Slash.
During Execute
- BC+BT -> Execute -> Draught -> BT -> Execute
Execute use is flexible, simply ensure Juggernaut stacks won't fall off during the 3s duration.
Using Odyn's Fury with Draught of Souls/Convergence of Fates
Spoiler:Even with Death and Glory, Odyn's Fury shouldn't be prioritized over Raging Blow. It's better used during Raging Blows cooldown, to replace a weaker Bloodthirst/Furious Slash. Simply put, the gain in using OF over RB is outweighed by the gain in using OF over FS/BT, even if it causes OF to be delayed overall.
"If Draught/OF has X seconds remaining and Battle Cry is off cooldown, should I use Battle Cry or wait for Draught/OF?"
Spoiler:Unless encounter mechanics dictate otherwise, it's typically better to use Battle Cry on cooldown and delay Avatar/Draught/OF for it, rather than delaying Battle Cry for any of them.
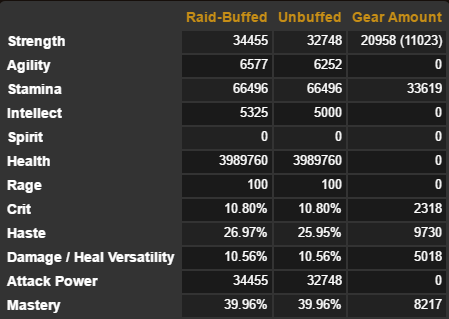
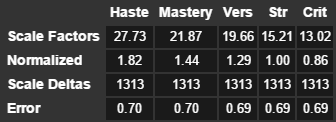
Stats
Note: Subject to change based on gear; individuals should always use their own personal stat weights.
Spoiler:All stat information compiled with 4p tier, Draught, Convergence, and all 7.2 talents.
Stat weights
Haste > Mastery > Versatility > Strength > Critical Strike
Avoiding Critical Strike is really the major consideration when evaluating gear.
Plots
Haste and Mastery are fairly close together, but Haste tends to be more consistently stronger. Don't worry about breakpoints so much as simply favoring Haste when possible, and Haste/Mastery over Versatility/Critical Strike.
Pawn
Use at your own risk; individual gear and resulting stat weights won't necessarily match these.

Class Campaign and Order Hall Optimization
There are plenty of other guides on MMO-C and WoWhead covering general 7.2 content, so this is only going to cover Warrior specific interests. Please note that much of this content is time-gated on live, and will be completed incrementally, rather than being available all at once as it was on the PTR.
The Class Campaign itself is a very straightforward quest chain available upon completing the Broken Shore introductory quests. Rather than reposting it all here, see my earlier post on the subject (note: some content has since changed and will be noted below as applicable).
Order Hall Advancement
Spoiler:
- Tier I
Rallying Cry is the only real option, as Odyn's Favor does nothing after reaching 110 and has no interaction with world quests.- Tier II
Forced March is the best option for missions, while For Honor and Glory is mainly for fun and flavor.- Tier III
Abundant Valor is far better in 7.2, since high quality Champion equipment can now be obtained much more frequently through missions.- Tier IV
Ascension is much better for reaching high mission completion percentages, seeing as Trial By Fire's small bonus is rarely impactful.- Tier V
Spoils of War is incredibly useful early on, although Val'kyr Call can be used once a stockpile of resources has been accumulated (note: it does not work on rare or equip world quests).- Tier VI
Legends of Ragnarok is the only option.- Tier VII
The choice here is fairly subjective - extra troops help complete bonus rolls, while sending out missions is limited by Champions. I tend to value bonus loot, but it's really 50/50.- Tier VIII
Legionfall United is the only option. The double trait Relic bonus no longer exists.
Class Hall Champions Guide
Spoiler:My pre-7.2 writeup can be found here.
There's a lot of leeway with regards to composition, and there's no single "best" setup. Mission counters are partially randomized, and your lineup will obviously change if you favor certain Champions or Combat Allies over others. The biggest optimization is simply ensuring you can counter as many threats as possible. That said, this is merely my logic regarding optimal combinations.
Quicklinks: New in 7.2 - Best Champions - Champion Analysis - Champion Equipment
New in 7.2
New Champion
- Darius Crowley (Alliance)/Eitrigg (Horde)
Unlocking the new follower also unlocks a 6th active champion slot, so you don't have to immediately deactivate a champion to drop back down to 5. Unfortunately, while I want to like them, I don't find the new Champion to be that attractive. Rather than add a 3rd Protection option, we got a 4th Fury, which means overlap and Crowley/Eitrigg has the same counters as the already well-used Hydmall. There simply isn't a lot of reason to use both, so unless you're going to use him as a combat ally, or don't want to use Hymdall, it may be better to deactivate them and use another follower instead - more on this below.
Tier 7 Advancement
- Strike Hard
Adds two new troops. Like Shieldmaidens, they provide a +30% bonus, but also provide a random counter. While at first glance this seems really attractive, I'm not very inclined to use them, especially if you've trained Abundant Valor, allowing a 4th Valarjar/3rd Shieldmaiden. I find Shieldmaidens on par or better with Ascension, and a lot of counters can situationally be ignored (increased cost, duration, lethal) depending on the mission.- Roster Champions
Unlocks a 7th active Champion slot, up from 6. I find this to be very useful in allowing more flexibility and variety in countering threats; it's essentially required to allow 2 of each counter, unless you don't want a dedicated Combat Ally.
My suggestion is dependent on your level of involvement.
- If you do missions often, leading to a well developed roster of Champions, of high level and complete with powerful equipment, I find that adding another Champion will make your team more flexible and three extra equipment slots can be far more powerful than extra troops.
- If you instead do the bare minimum, only sending out missions once per day or less, and don't have all epic/titled quality Champions, then extra troops will be more beneficial for getting high bonus % on the missions you send out.
Best Champion lineups
(what you really clicked here to find)
There are many viable setups, largely dependent on who you want to use as a combat ally, and which Champions you may have already leveled/geared up to this point.
A
Champion Special Abilities Counters Finna +15% vs Hazards 2 Protection Svergan +15% dual troop types 2 Fury Hymdall +15% over 8 hours 2 Arms Hodir +15% vs Minions 2 Pummel Thorim +15% when solo 2 Whirlwind Ymiron +poop 2 Leap Crowley (ally) +5% per troop vitality Fury/Leap backup
- Strength: Well balanced specs/counters.
- Weaknesses: Slightly weaker special abilities (Thorim/Ymiron), Crowley is now a much less useful combat ally.
- Optional allies: Thorim or Hodir can be used as optional combat allies if desired, just swap them when a mission they counter comes up.
B (my setup)
Champion Special Abilities Counters Finna +15% vs Hazards 2 Protection Svergan +15% dual troop types 2 Fury Hymdall +15% over 8 hours 2 Arms Dvalen +20% with 1 health troop 2 Pummel Ragnvald +5% per troop vitality 2 Whirlwind Thorim +15% when solo 2 Leap Hodir (ally) +15% vs Minions Fury/Whirlwind backup
- Strength: Well balanced specs/counters, Hodir is great for world PvP.
- Weakness: A lot of "solo champion" specials, Hodir is very good for missions.
- Optional allies: Dvalen/Thorim.
C
Champion Special Abilities Counters Finna +15% vs Hazards 2 Protection Svergan +15% dual troop types 2 Fury Hymdall +15% over 8 hours 2 Arms Hodir +15% vs Minions 2 Pummel Ragnvald +5% per troop vitality 3 Whirlwind Ymiron +poop 1 Leap Thorim (ally) +15% when solo Arms/Leap backup
- Strengths: Stronger special abilities, Thorim's buff is good for less geared players and in PvP, "KROLMIR!"
- Weaknesses: Only one dedicated Heroic Leap counter, though Thorim can be used for missions when not actively being used.
- Optional allies: Hodir.
D
Champion Special Abilities Counters Finna +15% vs Hazards 2 Protection Svergan +15% dual troop types 2 Fury Hymdall +15% over 8 hours 2 Arms Hodir +15% vs Minions 2 Pummel Thorim +15% when solo 2 Whirlwind Ymiron +poop 2 Leap Dvalen (ally) +20% with 1 health troop Fury/Pummel backup
- Strength: Well balanced specs/counters.
- Weakness: Weaker special abilities; Dvalen.
- Optional allies: Thorim/Hodir.
*Meatball & Moroes
*If you want to use Shocktroops instead of 7 Champions, either drop the dedicated Combat Ally, or drop Ymiron and use Thorim/Dvalen as combat allies to retain the second Arms/Pummel counter.
Champion Analysis
(long winded shit you don't care about)
Combat Allies
Mostly subjective, but can have a big impact on who you decide to run in your main mission-going roster.
- Finna - Random proc, 1.5m internal CD. Uncontrollable makes it annoying, often pulls neutral mobs or attacks PvP flagged players (and guards) in towns.
- Dvalen - Bodyguard. Useful at low levels, but fairly worthless at higher ones.
- Thorim - 2m CD 3m duration 25% AP buff with a short AoE stun 3m. Good in world PvP, and the buff is a nice ~10% damage increase that can be kept up permanently. Very useful for undergeared players, less useful when you're already two-shotting world mobs.
- Hodir - 3m CD 8s AoE stun, deals more damage than Thorim, but doesn't provide a personal buff. Very powerful in world PvP.
- Crowley/Eitrigg - A second combat ally, with the option of putting them in proc mode, working similar to Finna, which causes him to appear and bladestorm a group of enemies for ~500k damage.
Personally, I find Thorim and Hodir to be the best allies, because you can control them. I don't really like Finna because she often procs when you don't want her to, and her cooldown prohibits her from appearing when you do (she also procs on and chases non-hostile targets such as neutral mobs and PvP zone/server players not actively engaged in combat). She's also really important for her Pummel, since the other two champions which offer it are, in my opinion, pretty weak. Likewise, I'm not a fan of Dvalen for similar reasons, and I find the extra damage output unnecessary at higher gear levels.
Another important thing to remember is that Combat Allies can easily be taken on and off, meaning you can use them for the occasional mission, and so they should complement your group. This can compensate for an imbalanced roster, since you can still use them to complete missions, especially during "off" hours when not actively playing the game.
Missions
Protection
- Finna Bjornsdottir - Shield Charge synergizes well with the Shieldmaiden's Ascension, and the strongest option for Pummel.
- Svergan Stormcloak - Royal Bloodline is strong bonus with the right follower equipment, but requires two open slots for troops, making it difficult to counter missions with multiple threats. Pairs well with Shock Troops.
Arms
- Ragnvald Drakeborn - Commanding Shout has the highest bonus potential of all Champion special abilities. Slightly stronger than Thorim or Svergans bonuses because it still gets some benefit with only one troop and another Champion.
- Thorim - Titan's Wrath precludes any other Champions on the mission, making it more difficult to counter missions with multiple threats. Pairs well with Shock Troops.
- King Ymiron - Screams of the Dead is pretty bad in my opinion. A [I]chance/I] to save a 30m cooldown and trivial amount of resources. However, he provides Pummel.
Fury
- Hymdall - Gatekeeper is very useful as the hardest to complete missions are often the longest, and synergizes quite well with long-duration equipment bonuses.
- Hodir - Frozen Blows is almost always active, since his Whirlwind also counters Minions.
- Dvalen Ironrune - Enrage is useful though kind of niche; hard to plan on it being available, forces you to counter Lethal, and takes awhile to force availability if it's not already up. While the bonus can stack high, it encourages keeping troops at 1 health, which is at odds with Ragnvald/Crowley/Rallying Cry which benefit from high health troops. However, he provides Pummel, and is typically a better option than Ymiron.
- Darius Crowley/Eitrigg - Leader of the Pack/Blood and Honor is disappointingly the same effect as Ragnvald, although it is one of the stronger bonuses. His true fault is that his counter also copies Hymdall's, who is likely far more useful as a "long mission" specialist, and likely already well developed during the time leading up to 7.2.
Other
- Meatball & Moroes - Both are great champions, and can be really useful for hitting 200% with underdeveloped teams, but the downside is that they don't actually counter anything. Personally, I don't have much problem hitting 200% as long as I can counter the missions... the hard part is actually having whatever combination of counters it requires, which is why I favor regular champions. TLDR: Meatball & Moroes allow you to 200% one mission - having a wide range of counters allows you to 200% many missions.
If you do want to use them, my suggestion would be to use only one, either as a combat ally, or using your combat ally to cover any counters that you lose by replacing one of your primary mission going champions.
I tend to find Finna, Hymdall, Ragnvald, Hodir, Svergan, and Thorim the most useful due to their bonuses, while Dvalen and Ymiron the least, in that order. Since we're going for an extra Protection and Pummel, there really isn't a lot of choice - Svergan is the only choice, and unfortunately, getting a second Pummel counter requires the use of either Dvalen or Ymiron. Although Dvalen's special ability is better than Ymiron's, there are already too many good Fury picks, so Ymiron wins out in the end. This is why I find Roster of Champions more useful than Shock Troops - you can't get two of every spec/counter and have a dedicated ally without it. Although you could get by with 6 and a "flexible" combat ally used part time, I still favor an extra Champion, as it allows more variety and a greater chance of being able to counter missions.
As I said in the beginning, there's a lot of flexibility, and I don't really think there's any "right" choice as long as you can counter mission threats. The biggest influence is who you decide to take as a Combat Ally, and which Champions you may have already spent time leveling up/equipping already. I'm currently using setup B.
Champion Equipment (WIP)
Even more so than the Champions themselves, there's an incredible amount of leeway, the only real rule is to play to the Champions strengths.
My current setups are:
- Hodir - Overwhelming Focus, Fel Imp Tooth, Pathfinder's Saddle (+40% <4hr, -15% duration, -15% duration)
- Finna - Overwhelming Focus, Timeless Breath, Pathfinder's Saddle (+40% <4hr, +40% >4hr, -15% duration)
- Ragnvald - Skull Fallen Foe, Timeless Breath, Overwhelming Focus (+20% w/ Valks, +40% >4hr, +40% <4hr)
- Hymdall - Fetish, Timeless Breath, Bottomless Flask (+15%, +40% >4hr, +30% >4hr)
- Dvalen - Fetish, Timeless Breath, Wartorn Banner (+15%, +40% >4hr, +20% w/ Valarjar)
- Svergan - Skull Fallen Foe, Wartorn Banner, Fetish/Carrot (+20% w/ Valks, +20% w/ Valarjar, +15%)
- Thorim - Potion of Triton, Neckless of Memories, Elixir of Plenty (+50 gold, +25 gold, +100 resources)
Basically Hodir is my short mission specialist (can knock 5hr missions below 4hrs by himself), while Hymdall primarily deals with long missions. Finna and Ragnvald boost both roles due to their limited class counters; Svergan and Dvalen are built for troop bonuses, and Thorim is a primary combat ally only used for throwaway missions and the rare extra Arms counter.
Class Mount
Spoiler:Requires completion of a scenario, quest offered by Odyn, after finishing the Class Hall Campaign. May be additionally gated on live.
Or you can just collect extra Valarjar rep and farm for the real Warrior class mount.

Artifact Challenge/Mage Tower
Spoiler:
Naeno has already written an excellent overview of the fight, so rather than regurgitating it, I suggest taking a look at it for general advice. While the basis of the strategy most players are using revolves around out dpsing her Imp Servant's heal, which requires quite a bit of gear, hard swapping and killing them immediately requires just as much gear to not get overrun, so I really don't think one way has a lower gear requirement than another. Remember, this content is meant to last the majority of 7.2 for most players - not everyone is meant to complete it the first week of the patch.
Although I had a series of sub 10% wipes, I got pretty lucky with the timing of her abilities on the kill, so although the fight is mostly scripted, there is an element of RNG and some variance within her phases. If you feel as though you're doing everything correctly, but just getting stomped by certain combinations during the fight, I suggest trying to pushing her phases at a different time than normal.
You can also find a more comprehensive guide, written by me, here.
Tips & Tricks
- The fight is all about control; while the high DPS requirement makes it feel like a DPS race, it's actually a survivability one. You're better off saving cooldowns to deal with her adds (Umbral/Scorching Imps), rather than trying to simply burn her health down quickly. There's no enrage, so if you handle the adds well, you'll take less damage, and can keep the fight going as long as need be. I didn't even realize I killed her on my kill, being so focused on dodging mechanics, her defeat took me completely by surprise.
- Drums reset with each attempt now, though I still found them better to use during the latter portion of the fight - if you can't make it through Phase 1, you're not going to make it through Phase 2 anyway.
- Kiting the Fuming Imps with Piercing Howl is a valid strategy, though I found it more difficult due to losing GCDs, and often requiring me to kite away from the adds I was trying to kill. Ideally, you'll stack all of the Fuming Imps void zones atop one another to the side or under the boss.
- Pummel will sometimes not interrupt her channel, even if her shield is down. I haven't looked into the cause, though I believe I only ever saw it happen during phase 1.
- I'd recommend at least 900 ilvl equipped. It can certainly be accomplished with lower, but it will be increasingly more difficult to meet the damage and survivability checks.
- Talents - Shockwave/Wrecking Ball/Warpaint are alternatives, but I found that the adds were rarely grouped well enough to stun more than one or two at a time, and focusing on killing extra targets within cooldown windows emphasized the use of Furious Slash (with 4p tier) rather than Wrecking Ball-Whirlwind spam.
- Spiced Wildfowl - Not incredibly important, but works pretty well due to the high mobility requirement and frequent adds.
- Prydaz, Xavaric's Magnum Opus is ideal, as it's shield can save your life if you're hit by a stray boulder, leave her shielded too long, or allow too many Imps to stack up.
- Mannoroth's Bloodletting Manacles are key in allowing you to recover from mistakes. Prydaz will keep you alive, but you'll be in a vulnerable position until it comes up again, while Mannoroth's extra healing will allow you to heal up quicker.
- Naj'entus's Vertebrae seems good, though I don't think I'd recommend it. Done correctly, the strategy revolves around bursting down groups of adds during cooldowns, outside of which you shouldn't need to be Whirlwinding much.
- Kil'jaeden's Burning Wish is a great option for taking out groups of Imps quickly, though I don't think it's required, and given the option would probably favor defensive legendaries instead.
- Gronntooth Warhorn - While the trinkets stat increases are underwhelming, the extra damage against demons applies to all targets within the scenario. Certainly not required, in fact there's a lot of leeway with regards to trinkets.
- Draught of Souls - Viable option, though I'd suggest not using it with cooldowns (aside from the opener), and using it to quickly pop her shield instead.
- Convergence of Fates - Also not required; Battle Cry is best saved to handle large groups of adds rather than used on cooldown, though Convergence allows it to be used a bit more frequently which helps break her shield, especially if not also using Draught of Souls. You will need to have a good understanding of the fights timing to use it effectively.
As always, this guide is a living document; updates and beautification are an ongoing process.

 Recent Forum Posts
Thread: 7.2 Fury Guide & FAQ
-
2017-03-27, 02:47 PM #1Immortal


- Join Date
- Feb 2013
- Location
- California
- Posts
- 7,557
7.2 Fury Guide & FAQ
Disclaimer: This guide will only cover changes up to and including those included in patch 7.2. It does not include Tomb of Sargeras content, to include Tier 20, new trinkets, or as of yet unforeseen balance passes, so please don't ask about them.
Disclaimer: This guide will largely serve as a sequel to the previous 7.1.5 guide, some information will be duplicated, while outdated information will be removed. If you're looking for information which is no longer supported, check back there. Likewise, if you're a beginner looking for guides which give a more comprehensisve overview of the class and all it's different capabilities, I suggest checking my Wowhead or Icy-Veins guides.
Be part of the team, join the Warrior Discord today!
Quicklinks: FAQ - Rotations - Stats - Class Campaign and Order Hall Optimization - Artifact Challenge/Mage Tower
FAQ
"What's the 7.2 artifact path?"
"How do the new traits work?"
Spoiler:
"What are the best talents?"
Spoiler:
"What about other talents?"
Spoiler:
"Is there a BiS list?"
Spoiler:
"What are the best legendaries?"
Spoiler:
"What are the best trinkets?"
Spoiler:
"What are the best Relic traits?"
Spoiler:
"What's the best race?"
Spoiler:
"Is Jeweled Signet of Melandrus (auto-attack ring) still good"?
Spoiler:
"What about Ring of Collapsing Futures?"
Spoiler:
"Is Draught getting nerfed?"
Spoiler:
"Isn't it pronounced 'Draft'?"
Spoiler:
"If I have prot legendaries, exactly 18.63784 Haste, macro Fishbrul with Prolonged Power, keybind Bloodthirst to an unlocked mousewheel, and my cat refuses to coach me anymore, what will AMR say my best in bags is?"
Spoiler:
Rotations
Note: > means "greater than", not "and then". This means it's a priority list, not a step-by-step sequence.
Note: -> means "and then", not "greater than". This means it's a step-by-step sequence, not a priority list.
New in 7.2
- The new traits don't impact the rotation much. While Death and Glory makes Odyn's Fury stronger, it's still better used after Raging Blow, in place of Furious Slash or Bloodthirst.
- Massacre rotations will no longer be listed, they can be found in the 7.1.5 guide.
Frothing Berserker
Spoiler:
"Should I use Whirlwind instead of Furious Slash during Battle Cry?"
Spoiler:
Multi-target
Spoiler:
Using Draught of Souls
Spoiler:
Using Odyn's Fury with Draught of Souls/Convergence of Fates
Spoiler:
"If Draught/OF has X seconds remaining and Battle Cry is off cooldown, should I use Battle Cry or wait for Draught/OF?"
Spoiler:
Stats
Note: Subject to change based on gear; individuals should always use their own personal stat weights.
Spoiler:
Class Campaign and Order Hall Optimization
There are plenty of other guides on MMO-C and WoWhead covering general 7.2 content, so this is only going to cover Warrior specific interests. Please note that much of this content is time-gated on live, and will be completed incrementally, rather than being available all at once as it was on the PTR.
The Class Campaign itself is a very straightforward quest chain available upon completing the Broken Shore introductory quests. Rather than reposting it all here, see my earlier post on the subject (note: some content has since changed and will be noted below as applicable).
Order Hall Advancement
Spoiler:
Class Hall Champions Guide
Spoiler:
Class Mount
Spoiler:
Artifact Challenge/Mage Tower
Spoiler:
As always, this guide is a living document; updates and beautification are an ongoing process.
Last edited by Archimtiros; 2017-05-30 at 11:14 AM.
-
2017-03-27, 02:53 PM #2Epic!

- Join Date
- Mar 2012
- Posts
- 1,601
Wow this is really well done
 Originally Posted by Tonus
 Originally Posted by oblivium666
-
2017-03-27, 03:07 PM #3High Overlord


- Join Date
- Jul 2016
- Posts
- 179
-
2017-03-27, 03:13 PM #4Immortal
- Join Date
- Feb 2013
- Location
- California
- Posts
- 7,557
Unless you have extremely high haste, it causes DoS to be pushed out of cooldowns, so is not worth. Originally Posted by Creraria
-
2017-03-27, 03:15 PM #5Pit Lord

- Join Date
- May 2011
- Posts
- 2,441
Sticky this? and thanks Arch as per usual.
-
2017-03-27, 03:17 PM #6High Overlord
- Join Date
- Jul 2016
- Posts
- 179
-
2017-03-27, 03:22 PM #7Blademaster
- Join Date
- Jul 2016
- Posts
- 36
Well I guess that answers my question about why simcraft simmed me higher with 21% haste than 30%. I still hate seeing crit being so worthless.
-
2017-03-27, 03:24 PM #8Pit Lord
- Join Date
- May 2011
- Posts
- 2,441
Crit is worthless for the most part. It's kind of stupid that it's valued so low. Originally Posted by Flytanx
-
2017-03-27, 03:25 PM #9Grunt
- Join Date
- Sep 2011
- Posts
- 24
Amazing! Thank you. Eager to see what happens w/ T20.
-
2017-03-27, 03:39 PM #10Mechagnome
- Join Date
- Nov 2014
- Posts
- 672
i dont want to see what happens w T20, maybe 2t19 + 4t20 (or 4T20 + 2T20) will outperform legendary helm + back and force who wants to min/max to use crafted waist spending a ton of gold or leveling BS to 800 Originally Posted by Okereke
-
2017-03-27, 04:19 PM #11Blademaster
- Join Date
- Jul 2016
- Posts
- 36
Do you see Human surpassing Gnome/Dwarf in the near future in terms of DPS? Since their racial scales just wondering since I want to take advantage of the race change sale.
-
2017-03-27, 10:15 PM #12Grunt
- Join Date
- Feb 2017
- Posts
- 17
You stated that if you have DoS, it wouldn't be beneficial to fit OF into the BC rotation. If that's the case, do we just use OF on cooldown outside of BC?
Nvm, found the answer under DoS 'Without Lust'.Last edited by azztigma; 2017-03-27 at 10:21 PM.
-
2017-03-28, 07:26 AM #13Field Marshal

- Join Date
- Nov 2011
- Posts
- 63
Are the revamped feasts going to be a factor or is Azshari Salad still the go to food?
Lavish Suramar Feasts now grant 500 stats (was 200).Last edited by WoWAltoholic; 2017-03-28 at 07:29 AM.
-
2017-03-28, 07:44 AM #14High Overlord
- Join Date
- Jul 2016
- Posts
- 179
375 Haste/Mastery food will still be better if one of them has >1.33 the scale factor of str (500~1.33*375) Originally Posted by WoWAltoholic
So for most people either haste or mastery food will still be the better choice. But if your guild is providing feasts and youre not wiping to sub 1% you can still use it, at a small loss
-
2017-03-28, 12:34 PM #15Deleted
Thanks for the guide, awesome work as usual.
One question though: Is Simcraft working correctly? Cuz if so, I did sim the new traits and putting the initial 3 points you get (if you have maxed artifact right now) into Unrivaled Strength, Wrath and Fury and Raging Berserker you get pretty major DPS boost. Those 3 traits are only 4k DPS behind all the new traits combined which is 6 traitsLast edited by mmoc4bc1501723; 2017-03-28 at 12:38 PM.
-
2017-03-28, 12:57 PM #16Grunt
- Join Date
- Dec 2014
- Posts
- 16
I think archi said its like "would you want a 1% dmg boost now vs a 30% buff to OF by next week" Originally Posted by KratosEU
-
2017-03-28, 02:18 PM #17DeletedYeah ok thats true. Oathblood also sims very nicely. I guess Unrivaled Strength and then all in on the new traits like the guide says Originally Posted by Kopic
-
2017-03-28, 06:39 PM #18Grunt
- Join Date
- Jan 2016
- Posts
- 17
Thanks again for the guide Archi. This is nice to have on day one of the patch and hit the ground running. I'm just curious why kazzalax overtook the angry hat as BIS.
Last edited by Gannakis; 2017-03-28 at 09:11 PM.
-
2017-03-28, 09:03 PM #19Grunt

- Join Date
- Sep 2016
- Posts
- 14
Thanks a lot! The transition from rogue has been so much easier thanks to these guides and good discussions here. Much appreciated.
-
2017-03-28, 10:36 PM #20Mechagnome
- Join Date
- Nov 2014
- Posts
- 672
i think is becouse the angry hat now generates more rage over cap with the new weapon traits Originally Posted by Gannakis


 Reply With Quote

