 Build of the Month
You can also find this guide on Raidguru.net
Special Encounter Notes:
-Brutallus Cannot crushing blow
-Brutallus is tauntable, so threat is nearly a non-issue
-Brutallus SUPPOSEDLY gains no attack speed from Parries. What my guild has experienced does not go along with this AT ALL.
Background: Brutallus is the second boss in Sunwell. Quite simply, Brutallus is a gear check and a quality check for your guild. Your healers, tanks and DPS need to be at the TOP of their game in order to survive this fight. One mistake means you lose, period. Many people compare Brutallus to Patchwerk of Naxxramas in that he produces ENORMOUS amounts of tank damage and the raid his an extremely limited amount of time to plow through a large amount of hitpoints. To be more direct, he can kill a tank in under a second regardless of their gear and the raid needs to produce 27,777 DPS in order to kill him. In reality, it appears he has 10.4-10.5 million HP, which increased the amount of DPS needed to nearly 29K. As a result, many guilds have taken extra measures to reach higher levels of raid synergy and preparedness. Expect to do the same. Furthermore, once you enter Brutallus' room, you cannot escape it without pulling him first. He does not reset once pulled and will wipe the raid. If you need to exit for any reason, a warlock summon is the only way back to him.
Abilities (From WoWwiki.com):He is tauntable.
Meteor Slash - Deals 20,000 Fire damage split between enemy targets within 30 yards in front of the caster. Increases Fire damage taken to all targets affected by 75%. Stacks to 100, duration 40 secs.
Burn - Places a debuff on a player that lasts 60 seconds and spreads to targets near the afflicted player. The last three ticks will deal 3600, 3600 then 6400 fire damage.
Stomp - Reduces the effective armor of the targets hit by it (only seems to hit the tanks) by 50% for 10 secs. Removes Burn debuff if the target has it.
Enrage- After 6 minutes Brutallus will enrage causing untankable/unhealable amounts of damage. (500% more damage, 150% more attack speed)
Raid Compostion: Compositions can vary WIDELY on this fight. Generally you should use at least 9 Players per side to soak Meteor Slash.
Tanks- 2-3
Healers- 6-8
Ranged DPS- 8-10
Melee: 5-7
Layout:
MT= Main Tank R= Ranged DPS H= Healer M= Melee -Special thanks to Kluian GL of GC-Korgath for the layout help.
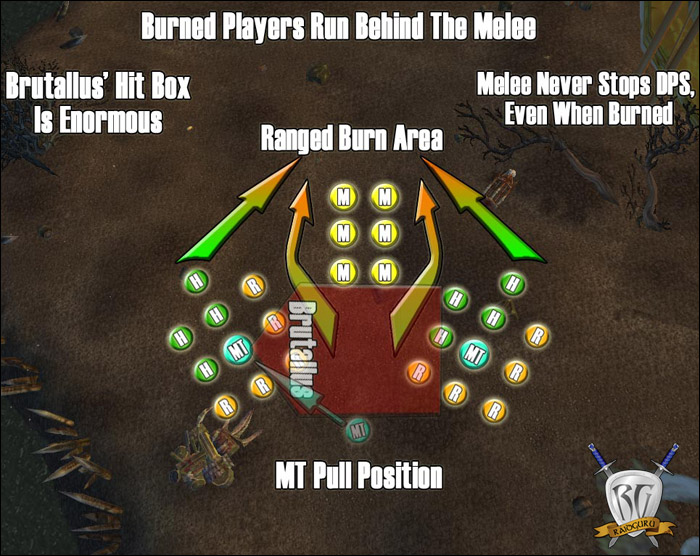
The raid will be formed into three groups (1 melee, 2 tank/ranged). 2 Groups are spearheaded by a main tank and consist of healers and ranged DPS. It is important that healers are alligned towards the center of the raid so that they can reach anybody in the raid when needed. As well, I advise mages to be placed in the more centralized positions within their group because they can blink out of the group and iceblock burn, which cuts down on player movement and thus player activity time. These 2 MT/ranged/healer groups MUST be spaced evenly 180 degrees from each other, or else they risk Meteor Slashing burned players. Any player from the 2 ranged groups (minus tanks) that receives a burn debuff which they CANNOT remove must run to Brutallus' West Flank (behind the melee), behind his center point as to avoid further stacks of MS. Every single healer/ranged DPS should be in their position prior to the pull.
Melee are positioned in 2X3 rows starting from slightly behind Brutallus' center. Despite common belief, raids can use 7+ melee. The main issue with stacking melee has little to do with positioning, but far more to do with sharing Meteor Slash's damage. Rogues should be kept further towards the center as they can COS burn off. Melee MUST be in position or as close as possible when the pull goes out. Failure to do so will result in DPS losses which cannot easily be made up for. If any melee are causing parries, POSITIONING MUST BE FIXED ASAP.
The Pull:
Pulling Brutallus to EXACTLY the right spot is neccessary. If he oversteps his mark just slightly, it will cause repositioning, which in turn will cause lost healing time and DPS. Every player needs to be exactly in their positions and melee must be as close as they can be to where they are to DPS from. The first tank who holds Brutallus will stand IN BETWEEN the two ranged groups and slightly east from there. A hunter will MD the tank from about 10 yards directly behind the crate which is placed in between the raid and Brutallus. From here Brutallus will engage the tank who will quickly swing Brutallus as he moves to his preassigned tank position, which spearheads his group.
Everything Is A Balancing Act:
The trickiest part of this fight is tweaking the healing and DPS to exactly where you want it. There are a few ways in which this is possible. By stacking more healers, you of course increase raid survival untill the enrage. Some guilds are able to succeed with 6 healers, while others need 8-9. This laregely depends on the quality of your tank's gear AND if you have druids or warriors tanking. Druids simply take far less damage than warriors when stomped, which in turn can cut down on needed healing. Your raid can also use a 3rd tank to absorb stomp and possibly intervene the other tanks when they dip low on taunt transitions and the such. This may allow you to cut out a healer and slightly increase survivability and DPS as that tank can provide 100K damage over the course of the fight.
What is even more essential is balancing your DPS make up. Using a retribution paladin, 3 warlocks, moonkin, shadow priest, survival hunter, 33/28 MS warrior, enhancement shamans and elemental shamans can GREATLY increase your raid's DPS output. Depending on if your raid is more caster focussed or physical focussed, you need to choose who adds the most overall DPS carefully. Even though a few classes don't provide much synergy (BM hunters, Mages, Rogues) They all bring something to the table. BM hunters can produce enormous amounts of damage on this fight and mages+rogues can not only dump LOTS of damage, they also can ice block/COS the burn off. So again, it is all a balancing act, even with the DPS.
So overall, you face quite a few dilemmas, namely they are:
3 tanks with higher survival, less heals vs 2 Tanks with 1 more DPSer in the raid
1 Extra tank healer vs 1 Extra DPSer
3 raid healers vs 2 raid healers and an Extra DPSer
Raid synergy classes Vs Raid survival classes i.e.
I suggest that you tweak your strategy to what you need at that particular point in time. Your first goal should be to hit the enrage, and then to cut back on healing untill you are getting close to the kill. From there, use full out juice and go for it.
Strategy:
As stated before, this fight is about healing as hard as you can and DPSing as hard as you can. The following will show you how to deal with his abilities and special methods for healing, mitigating and DPSing.
Dealing With Burn:
Burn causes deaths and DPS/Healing losses far more than any other ability. Players with stacks of Meteor Slash will take FAR more damage from burn and can possibly be unhealable by the final ticks. It takes at least 2 healers to keep up any player with burn. Hopefully you have at least 1 restoration druid to keep hots on players with burn and 1 extra healer who can pump out large heals. I've known guilds who use paladins, shamans and priests as the extra healer. I prefer using a priest as they can Hot, do large single target heals, can binding heal if they are burnt and PWS burnt players.
All burnt players minus tanks and melee need to run to the east flank and behind Brut's center as soon as they possibly can without running into other players. Classes which can remove burn (rogues, mages, paladins) must do so as quickly as they possibly can. When multiple players from the same ranged group move to the wagon, their side is bound to take a larger share of the Meteor Strike. Tanks have their burns removed via stomp and melee can receive heals from their spot without complication as they do not receive Meteor Slash.
The real tricky part of burn is dealing with multiple players who have it. Upwards of 3 people can be burnt at a time, and as the damage progresses, it is NECCESSARY to focus the non druid healer on player with the most stacks. The druid should always stay focussed on keeping up the two players closest to the end of their burns and maintaing all hots on them. The most recent burn victem can survive for a long time with heals as the DOT starts at a lower amount and scales up.
Now, if you DO HAVE A METEOR SLASHES BURN VICTEM, you need to decide if they are going to live or die. This involves SOULSTONING that player and switching heals to other targets. If you are in the position of having 3 burn victems and 1 of them has heavy stacks of Meteor Slash, your best bet may be to call out for a soul stone and focus the healing on the remaining players. If you attempt to heal all 3 players in this scenario, you may end up losing 2. In this case it is up to the burn healers to call out for the soulstone and it is on the burnt player to announce that they have stacks of MS going into it.
Furthermore, KNOWING WHEN your MS FADES is just as important. If you receive burn with just a few seconds left on your MS, you are fine. If you receive burn shortly after the 2nd or 3rd stack was applied, your debuff is bound to last. Calling these things out is simpy important.
Meteor Slash and Sharing The Love:
Meteor Slash is usually not an issue and can be healed through by 2-3 resto shamans and holy priests without much complication. In fact, the resto shamans SHOULD be chain healing off of the main tank at that time in order to proc Ancestral Fortitude on them for stomp. Obviously, holy priests will produce the MOST healing here. If your groups are set up perfectly, with 10 players in 2 gorups on both sides, 2 priests can EASILY COH the raid through MS. This can purchase your raid another MT healer or DPS slot.
Where Meteor Slash can become problematic is when too many players from one group have burn. For this reason, it is advised that you use as many ranged players as possible, without killing your Raid DPS or sacrificing important synergies. If 6 or less players share the third Meteor Strike of a cycle, it will land for upwards of 10,000 damage and kill any player not fully healed before hand. This is why you should always have 10 players per group (1 tank, 9 ranged/healers), so that in the event that 3 of your players get burnt, you are still able to survive the third meteor slash without too many issues.
Tanking Rotation:
There are two options here, the 2 tank method and the 3 tank method. I will explain the pros/cons of both and how the system works.
MS Cycle- Simply put, the tanks switch off after every third Meteor Strike. That is the whole crux of the tanking and MS damage splitting right there. This does not mean that the taunting tank needs to move AS SOON as MS goes out, as there are cases in which this is a stupid idea. Knowing the timing of stomp along with the MS cycle is CRUCIAL. The taunting tank can bypass a few stomps along the 3-4th MS cycle by taunting both AFTER THE 3rd MS, AFTER A STOMP AND BEFORE THE 4TH MS. This involves a bit of communication and healers need to know if they are switching right away or not. If executed properly, tanks WILL avoid having to be healed through a few Stomps as they will be fading on his partner who won't be receieving damage. Now, being ON THE MONEY with that taunt after stomp is EXTREMELY important and I cannot stress that enough. This system applies to the two tank method and the 3 MS cycle applies to the 3 tank method as well.
3 Tank method- The purpose of the three tank method is to completely avoid the catastrophic effects of stomp. By using a third tank over a DPSer, your raid will of course drop down in damage. Using a third tank can POTENTIALLY take a healer spot instead. Now, the purpose of the third tank is simply to soak up all stomps. They can be positioned to the open side of the current tank as to prevent burn spread and should stay with the melee otherwise in order to avoid high MS stacking. Every 30 seconds, this player has to run to his proper tanking side, taunt the stomp off, and then have Brutallus taken off of him ASAP. I personally do not like this method as it causes a larger healer division in that 1 player would need to get the third tank up at some point (likely a raid healer). As well, this player has to move around quite a bit, and on this fight, you want motion to a minimum.
Getting Through Stomp:
If you are using a two tank method, your tanks will NEED to be healed through stomp. With a three tank method, your third tank will eat all of the stomps and intervene the taunting warrior during his transition in. Quite simply, stomp is a tank killer. We use a ridiculous amount of buffs in order for our tanks to survive such as major defense elixirs, stam food, scrolls of protection V, scroll of agility V, improved devotion aura, GOA and more. Not only do we try to increase our armor and avoidance as much as we can, we also use massive amounts of HP gear. Furthermore, warrior tanks need to use all sorts of cool downs as possible. Because we use a discipline priest, our warrior tank receives a pain suppresion on every other stomp. The reamaining stomps they use Moroes' Pocket Watch for, which brings them to 70% avoidance after the sunwell mob buff (-25% avoidance). Also, The warrior tank's rotate HP buffs such as Shadow Moon Insignia, Nightmare Seed and Last Stand. This makes for near perfect survivability on the warrior tank.
Post Script Note: As we have learned more and more about this fight and how to counteract stomp, we have discovered another method for effectively dealing with the damage load. Basically, warrior tanks can stack extra armor value by carefully choosing their pieces and using the Ancient Aqir Artifact from Zul'Jin in Zul Aman. With the following, our warrior tanks were able to break 20500 AC unbuffed: 240 armor patch on gloves, 120 armor enchant on a Slikk's Cloak Of Placation (only 35 badges), The Exalted Violet Eye Tank Ring, The Magtheridon Head Ring (another easy one to get) and the Unbreakable will with mongoose. With full raid buffs (elixir of agility, elixir of major defense, wotw, devo, inspiration/ancestral fort, goa, scroll of agi V, scroll of protection V, ironshield) we were able to reduce our damage during stomp to ~8-9K from main hand hits. Keep in mind, this is with curse of recklessness on Brutallus.
For druid tanks, they usually do not have any cool downs to use in order to survive. Thus, healers need to be ready to keep them up via spam healing. The Commendation of Kael Thas helps for druid tanks as it will nearly ALWAYS be active during stomp (33% up time potential, only procs below 35% HP) and provides them with 8% dodge and 57 stam. It is important that your druid understand the importance of armor here and uses everything they can to be capped, and potentially then some. Druids do not receive directly half of the armor cap (17500) on stomps and CAN get bonuses that go beyond that. They however can only receive 17500 AC from armor, so it is important to max that first. With Ironshields popped during their off phase, elixir's of defense, Ancestral Fortitude, Agi Scroll V, Scroll of Prot V, GoA and MOTW, they can be over 24-25k AC Even while stomped. Further more, make SURE TO USE BARKSKIN prior to taunting Brutallus back to you.
Healing:
Main Tank Healing- I advise using at least 2 healers on the Main Tanks, 3 if you are using a warrior as a Main Tank. The hardest periods of tank healing are of course, during stomp. Tanks should be using CD's on rotation to survive stomp, but even so, they need to be watched very carefully. For FSB, we use a Druid Tank and a Warrior tank. Natrurally, warrior tanks will take more damage during stomp as they face a greater armor loss, BUT we more or less cur this down by alternating moroes trinket (15% dodge, brings me to 70% avoidance WITH the sunwell mob buff) and pain suppresion from our disc priest. This more or less ensures the survival of the warrior healer, but does nothing to help with the druid. The druid, in this case, will now face a greater risk during stomp. Regardless, the only thing you can do is spam them to keep them up. THE OTHER TRICKY PART is healing during transitions. Your MT's won't always switch exactly off of the third MS, so you need to be ready to change up your pacing a bit. Listen to their calls for rotating on stomp rather than MS as this will change WHEN you switch tanks, which MUST be done as fast as humanly possible. With 3 healers, I suggest one of them exits to the incomign main tank shortly before the third MS, or shortly before the stomp if they are rotating off of that. This should provide continuity of healing and the fresh tank should be fine untill the other MT healers get on him, shortly therafter.
Raid Healing/MS Healing- You will need a combiniation of holy priests and resto shamans to get this job done, between 2-3 depending. These guys are more or less just healing through the Meteor Slashes, which requires nearly non stop casting. Generally, the shamans chain heal off the main tank and sometimes break off to top off the raid after the third MS on each side. With three raid healers, two should clean up the third MS (which is the end of that groups' damage for the cycle) while the other one (a shaman) should move to the new main tank to proc ancestral fortitude.
Burn Healing- See above section "Dealing With Burn." Basically, 2 healers must be assigned to this task and know the full parameters of what they are doing and who has burned. Please read the above section for inricate details on what they need to know, and how they need to do it.
Tweaking DPS and MP/5: Push It To The Limit, Walk Along The Razor's Edge
There are a number of things raids can do to up their DPS. The first, is making smart groups.
-Group Considerations: Possibilities from how to adjust your raid.
-Feral Tank in the hunter group
-Survival hunter away from people drums
-Rogue in the hunter group
-MS and RET always need WF
-Caster DPS group should be ONLY casters, no healer. Ele shamans make a huge difference here.
-Boomkin with healers- Their DPS loss to the group hurts, their gains to the healers help. IS and FF work regardless of where they are
-Extraneous healers in the MT group
-Shadow Priest with the healers- Namely pallies and shamans face larger mana issues than priests and druids. It would be wise to ensure your raid healers and MT healers never go OOM.
-Switch out affliction locks/extra healers/shadow priest for double lust on the caster groups
Post Script Note:
FSB's group format for our first kill:
Group 1:
Main Tank- mana drums
Holy/Disc Priest- MT healer
Holy Priest- Raid Healer- required 1 innervate
Resto Druid- Burn healer- mana drums
Resto Shaman- Burn healer- lust went to melee
Group 2:
Survival Hunter
Beast Master Hunter- haste drums
Beast Master Hunter- haste drums
Feral Druid as melee
Restoration Shaman
Group 3:
Destro Lock- haste drums
Destro Lock
Destro Lock
Elemental Shaman- haste drums
Moonkin Druid- haste drums- Removed for out of group lust
Group 4:
Rogue- haste drums
Rogue- haste drums
Enhancement Shaman- haste drums
Retribution Paladin
33/28 Mortal Strike Warrior- removed for out of group lust
Group 5:
Main Tank- Gets Devo aura+extra heals from VE
Shadow Priest- Gives mana to the three most needy players in raid
Holy Paladin- Main Tank Healer
Resto Shaman- Raid Healer- Chain healed off of the MT's- Lust given to Group 3
Frost Mage- had massive haste gear to compensate for spec
Leathworking:
-Drums of battle are HUGE on this fight. 80 haste/5% faster attack rating is just enormous. If you have 4 LW's in your melee group, they have a 100% up time on drums and should establish a rotation order. Casters also benefit enormously from drums of battle and can make some serious DPS gains when combined with other haste modifiers (Bloodlust, etc).
-Drums of restoration. These can be tricky to fit in to a healer's game here, as they need to chain heal the entire 6 minutes. However, these can also save a healer on their mana when multiple healers use them, much like spell surge. As an MT with healers in my group, I use these to help my healers keep their mana up to the best of my ability. There is no cast time on them, but they do consume a GCD.
Elixir Of Demonslaying- This is the best BM hunter and Melee potion you can use for this fight. It provides 265 AP and needs to be refreshed 5 minutes into the fight. This pot counts as a battle elixir but provides enormous DPS gains. Given the rarity of Ghost Mushrooms, try to save these for kill attempts.
Scroll of Agility V- This does not stack with agi food but gives the same result and no additional cost. As a result, players can use hit food, AP food, or stam food depending on their role. These are EXTREMELY HARD to come by as they are only purchasable from the Skettis vendor with a costume on, or via mob drops. You can on occasion purchase them from repair bots.
Alchemy Stones- Shamans and Paladins NEED to get these things. I cannot tell you how important they can be for keeping their mana up through this fight when they aren't paired with a shadow priest. Considering that the new 119 alchemy stone is the single best healing trinket in the game, mana pressed healing classes really should pick them up.
Nether Protection On Warlocks- We've dug through a TON of WWS reports to see what NP actually does and does not do for this fight. It seems NP procs off of MS, but not burn. That, or for the 4 seconds while NP is active from a burn, MS will not gain another stack. We have consulted with a number of guilds who have tried this, and thus far the general concensus is that it is worthless. Thank you ripz from GC for the insight on this talent in regards to the fight.
And that is all people, if you have any comments, questions of concerns, feel free to post them on the Raidguru Forums
