 Build of the Month
Fetid Devourer is a boss in the Uldir raid in World of Warcraft. Our strategy guide will help you to defeat the Fetid Devourer encounter and the loot listing below contains all of the loot it drops on each difficulty.
Table of Contents
Overview
Fetid Devourer seems to be the Butcher style, damage check of the raid. This encounter requires the raid to kill the boss, while dealing with a small number of crucial mechanics which become more difficult at 50% health.Fight Basics
- The boss should be moved to the closest Corruption Corpuscle whenever they spawn, giving melee DPS a chance to cleave damage.
- The boss will cast Thrashing Terror every four auto attacks, so make sure to never stand on top of the tanks.
- At 50% health, the boss will enrage to deal 25% more damage, but take 50% more as well.
- The raid should be loosely spread around the boss to make dodging Rotting Regurgitation easier.
Strategies by Role
All Roles
- At full energy the boss will cast Rotting Regurgitation towards a random player. Everyone should move away from the direction the boss is facing to avoid being hit.
- When the boss casts Shockwave Stomp, position players should position themselves with their back towards the closest wall to avoid being knocked far.
DPS
- Corruption Corpuscles will need to be killed before they finish casting Enticing Essence.
- The boss will take increased damage below 50%, making this the best time to use cooldowns such as Bloodlust or Heroism.
Healers
- Players affected by Malodorous Miasma or Putrid Paroxysm will take a significant amount of periodic damage and will require spot healing.
- The tanks will take a very large hit of damage each time the boss casts Terrible Thrash.
Tanks
- Both tanks should stand on top of each other to share the damage from Terrible Thrash.
- After the boss reaches 50% health it is best to alternate after every few Terrible Thrash stacks, because they will require a defensive cooldown, or active mitigation to survive.
- The boss should be moved to the closes Corruption Corpuscle if possible to make cleave damage more efficient.
Detailed Fetid Devourer Strategy Guide
Created by Crzypck, officer and Raid Leader of Mist on Area 52. This guide is geared towards Heroic and Mythic, with no details about Normal difficulty. If you have any questions, please feel free to ask!Crzypck can be reached here on MMO-C, or on Discord at Crzypck#6309. If you find this guide helpful, feel free to throw him a follow on Twitch.
Also, special thanks to Limit, the World #2 and NA #1 guild, and specifically Tagzz for consulting on the Mythic strategies!
Whole Fight Mechanics
- Fairly standard tank and spank fight
- One phase encounter
- Circular room with 6 crevices around the edges
- The Cheese Strategy is Recommended for Normal/Heroic
- Shockwave Stomp
- This is a short cast by the boss that cannot be interrupted.
- It deals medium AoE damage to the entire raid.
- It also knocks back players a significant distance.
- Corruption Corpuscle
- 2 stationary blob adds spawn in random crevices around the room and begin to channel a cast.
- At the end of the cast, the boss will charge to whichever blob is closer, eat it, and heal for 10% HP + 20 energy.
- Blobs must be killed and are a priority target over the boss. Melee kill whichever is closer to boss while ranged kill the furthest one from the boss.
- On heroic difficulty and higher, these blobs heal themselves for 1% HP every 2 seconds.
- Rotting Regurgitation
- This is a frontal cone breath ability that is targeted towards one random person. It is used whenever the boss reaches 100 energy.
- This ability will kill you if you stand in the cone when it finishes casting.
- The raid must dodge this. You can just run behind him or get out of the cone spray.
- Malodorous Miasma
- This is a fairly weak dot that lasts 18 seconds.
- At the end of the 18 seconds, it morphs into Putrid Paroxysm.
- Putrid Paroxysm inflicts much higher damage every 2 seconds for 6 seconds.
- If you have Putrid Paroxysm, and are afflicted with Malodorous Miasma, you instead gain another stack of Putrid Paroxysm. This is very deadly if it happens.
- Players will need to be spot healed when this ability morphs into Putrid Paroxysm.
- This effect can stack.
- Thrashing Terror
- This is a tank mechanic.
- It starts at 3 stacks and each time the boss hits with a melee, one stack drops.
- When stacks hit 0, the boss will cast Terrible Thrash
- Terrible Thrash smashes the closest target to the current tank for 300% of standard melee damage.
- This damage must be soaked by the offtank with mitigation up.
- Fetid Frenzy
- The boss enrages at 50% HP, dealing 25% more damage and taking 50% more damage as well.
Strategy
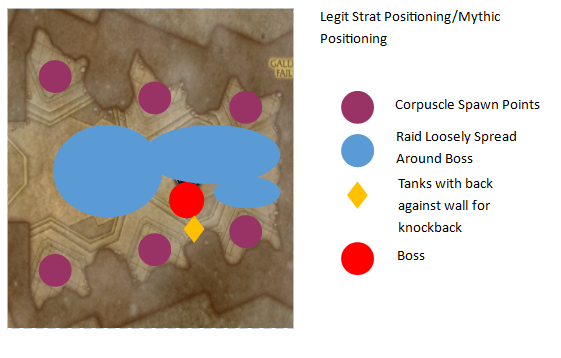
- Loosely spread throughout the room with the tanks having their backs against a wall between two of the crevices as shown in the graphic below.
- Dodge the Rotting Regurgitation.
- Get back into position after boss casts Shockwave Stomp.
- It isn't a bad idea for ranged players to move closer to the boss right before Stomp goes out, just so they don’t need to run back as much after the pushback.
- Some movement altering abilities can negate the knockback aspect of this, such as Disengage, charge, DH doublejump, etc.
- When the blobs spawn, melee DPS should switch to the closest one while ranged switch to the further one.
- Save Bloodlust for the 2nd set of 3 min cooldowns or during the execute period.
- ALWAYS lust immediately after killing a set of blobs.
Cheese Strategy
- While mathematically it's actually a damage setback, a significantly easier way to defeat this encounter with low DPS is to either skip blobs entirely, or only kill 1 of the 2.
- Regardless of your raid's overall DPS, it is recommend to kill no more than 1 blob.
- This obviously means the boss will get to heal, but if you fail at killing a blob, you wasted all that DPS anyway.
- It is recommended to always kill the blob that spawns closest to the boss, then switch back to boss and ignore the 2nd blob.
- Once the boss pushes below 50%, pop Bloodlust and ignore all blobs entirely.
Mythic Abilities and Strategy Guide
- This boss is the DPS check of Uldir
- It is recommended to take a 2 Tank, 4 Healer, and 14 DPS composition.
- Malodorous Miasma will spread to an additional nearby player every time it deals damage.
- There is a small visual circle around affected players that looks to be about 3 yards. Don't stand in it.
- Putrid Paroxysm will spread to players in a large area each time it deals damage.
- It has a larger visual circle that appears to be 8-10 yards. Don't stand in it.
- Mutated Mass
- 3 blobs will now spawn - 2 Corrupted Corpuscle and one Mutated Mass
- The Mutated Mass has significantly more HP than Corpuscles and has twice as long a cast time before being eaten by the boss.
- Mutated Mass always spawns at the first waterfall to start spewing.
- This add is an extremely tight DPS check.
- Once the Mutated Mass completes its Enticing Essence cast, it begins to heal itself for 10% of max health every 10 seconds.
- This makes killing it after the cast ends quite difficult.
- Any blobs that the boss eats now heal him for 30% of his max HP.
- Because of the very tight DPS check, killing the blobs is difficult. It is recommended to have 6 DPS on each small blob while the remaining 2 DPS start on big blob. As soon as the little blobs die, everyone hard swaps to the big blob. A single fail at killing a blob is a raid wipe.
- Tanks should position the boss on the big blob.
- The raid will need to be spread around the boss. Dodging the Rotting Regurgitation becomes more difficult on Mythic due to more debuffs, and the Putrid debuff.
- All players affected by debuffs will need to watch positioning so as to not block in anyone else with their debuff circles.
- Think of it as similar to Mythic Argus. People with rage had to watch positioning and not trap people. It is the same idea here.
- Overall positioning is very important on Mythic. You need to use the Shockwave Stomp knockback to your advantage. It always occurs right after the blobs spawn, so plan your knockback positioning around where you want to land.
- Healers should have assigned positioning. 2 healers should be with the tanks, and 1 healer per blob group.
- This boss uses the same Bloodlust timing as Heroic. Depending on the group it’s best either at 50% immediately after finishing killing a set of blobs, or waiting for the 20% execute range, also immediately after killing a set of blobs.
Mythic Kill Video
Thanks to Limit for the Mythic kill video!
Fetid Devourer Encounter Journal
Originally Posted by MMO-Champion
The experiments within Uldir conducted tests upon countless lifeforms, including several loa who inhabited the forests around Zandalar. After the experiments proved lethal, the loa's remains were disposed of improperly, much to the delight of the dark consciousness imprisoned within Uldir.- Overview - Periodically, Waste Disposal Units around the room will activate, dumping waste into the room and leaving behind Corruption Corpuscles. Players must kill these before they release Enticing Essence, or Fetid Devourer will move to them and Consume Corruption, healing and gaining energy.
At 50% health, Fetid Devourer will enter into a Fetid Frenzy.
- Tanks -
- The primary tank on Fetid Devourer will take more consistent - but overall higher - damage.
- The second tank should stand near the primary tank to be hit by Terrible Thrash, and be prepared for large spikes of damage when it hits.
- Be prepared for the damage increase due to Fetid Frezy!
- The primary tank on Fetid Devourer will take more consistent - but overall higher - damage.
- Healers -
- Terrible Thrash deals very high damage.
- After players are afflicted with Malodorous Miasma, they will develop Putrid Paroxysm, which inflicts high damage and requires focused healing.
- Be prepared for the damage increase due to Fetid Frezy!
- Terrible Thrash deals very high damage.
- Damage Dealers -
- Kill Corruption Corpuscles before they finish releasing Enticing Essence.
- When Chimaera nears 100 energy, prepare to avoid Rotting Regurgitation!
- Kill Corruption Corpuscles before they finish releasing Enticing Essence.
- Tanks -
- Thrashing Terror - Every fourth attack, Fetid Devourer will use Thrash on the closest player to the current tank.
- Terrible Thrash - Thrashes the target, inflicting 300% of a standard melee attack to them.
- Rotting Regurgitation - When Fetid Devourer reaches 100 Energy, he unleashes a Rotting Regurgitation, inflicting 75 Nature damage, knocking back and applying Maldorous Miasma to targets in a cone in front of him.
 Shockwave Stomp - Inflicts 28 Physical damage to all players and knocks them back.
- Malodorous Miasma - The foul stench of the area sickens players, inflicting 5 Nature damage to afflicted players every 2 sec. for 18 sec. This effect stacks.
When this effect expires, it mutates into Putrid Paroxysm on the affected player.
- Putrid Paroxysm - Inflicts 17 Nature damage every 2 sec. for 6 sec. This effect stacks.
If a player with Putrid Paroxysm would be afflicted with Malodorous Miasma, they instead gain a stack of Putrid Paroxysm.
- Putrid Paroxysm - Inflicts 17 Nature damage every 2 sec. for 6 sec. This effect stacks.
- Fetid Frenzy - At 50% Health, Fetid Devourer frenzies, increasing damage dealt by 25% and damage taken by 50%.
- Consume Corruption - Whenever Fetid Devourer senses Enticing Essence, he will move to consume the source, healing Fetid Devourer for 10% and granting 20 Energy.
 Waste Disposal Units - Periodically, Waste Disposal Units around the room will activate, dumping waste into the room and leaving behind Corruption Corpuscles.
On Mythic Difficulty, one of the Waste Disposal Units will activate early, creating a Mutated Mass - a larger Corruption Corpuscle that casts Enticing Essence more slowly.
Standing inside the stream of waste from a Waste Disposal Unit or being hit by Rotting Regurgitation will also apply Malodorous Miasma.
- Corruption Corpuscle -
- Enticing Essence - Releases pheromones, drawing Fetid Devourer to consume the Corruption Corpuscle.
- Mutated Mass -
- Enticing Essence - Releases pheromones, drawing Fetid Devourer to consume the Corruption Corpuscle.
- Corruption Corpuscle -
Taloc Achievements
| Name | Points | ||
|---|---|---|---|
| |||
|
Fetid Devourer Loot List
Fetid Devourer drops item level 340 (LFR), 355 (Normal), 370 (Heroic), 385 (Mythic) loot. Loot can have higher item levels if it becomes Titanforged or Warforged.| Level | Type | Slot | Name | Model Viewer |
|---|---|---|---|---|
| Type | Slot | Name | ||
| 340 | Trinket | Trinket | ||
| 340 | Back | Back |  Modelviewer Modelviewer | |
| 340 | Cloth | Head | Modelviewer | |
| 340 | Leather | Chest | Modelviewer | |
| 340 | Feet | Modelviewer | ||
| 340 | Plate | Hands | Modelviewer | |
| 340 | One-handed Axe | One Hand | Modelviewer | |
| 340 | Staff | Two Hand | Modelviewer |
| Level | Type | Slot | Name | Model Viewer |
|---|---|---|---|---|
| Type | Slot | Name | ||
| 355 | Trinket | Trinket | ||
| 355 | Back | Back | Modelviewer | |
| 355 | Cloth | Head | Modelviewer | |
| 355 | Leather | Chest | Modelviewer | |
| 355 | Feet | Modelviewer | ||
| 355 | Plate | Hands | Modelviewer | |
| 355 | One-handed Axe | One Hand | Modelviewer | |
| 355 | Staff | Two Hand | Modelviewer |
| Level | Type | Slot | Name | Model Viewer |
|---|---|---|---|---|
| Type | Slot | Name | ||
| 370 | Trinket | Trinket | ||
| 370 | Back | Back | Modelviewer | |
| 370 | Cloth | Head | Modelviewer | |
| 370 | Leather | Chest | Modelviewer | |
| 370 | Feet | Modelviewer | ||
| 370 | Plate | Hands | Modelviewer | |
| 370 | One-handed Axe | One Hand | Modelviewer | |
| 370 | Staff | Two Hand | Modelviewer |
| Level | Type | Slot | Name | Model Viewer |
|---|---|---|---|---|
| Type | Slot | Name | ||
| 385 | Trinket | Trinket | ||
| 385 | Back | Back | Modelviewer | |
| 385 | Cloth | Head | Modelviewer | |
| 385 | Leather | Chest | Modelviewer | |
| 385 | Feet | Modelviewer | ||
| 385 | Plate | Hands | Modelviewer | |
| 385 | One-handed Axe | One Hand | Modelviewer | |
| 385 | Staff | Two Hand | Modelviewer |
