 Limited PvP -> PvE Free Character Transfers
 The Cataclysm Classic Pre-Expansion Patch Arrives April 30
 Season 4... Just old dungeons and new ilvl?
 [WeakAura] Tombstone's Conditions
 Did Blizzard just hotfix an ilvl requirement onto Awakened LFR?
 MMO-Champion


This is the situation. I have 2 computers next to each other. One is windows 7 and one is windows Vista incase that matters.
I'm using the command prompt (running as administrator) and typing "shutdown -i" to bring up the GUI and then I'm typing the IP address when I press on add but it coems up with "Access Denied". Both computers are mine and I should be able to do this but it just wont work and I can't find anything else to turn on so I'm asking here.
Another concern is that when I type "net view" it comes up with "There are no entries in the list.". I'm not that amazing with computers but I can't understand why it cannot find a path when both computers are connected with a wire to the same router.
Any ideas on what I'm doing wrong? :S
 Recent Blue Posts
 Recent Forum Posts
-
2011-09-24, 02:25 PM #1The Patient

- Join Date
- Mar 2011
- Posts
- 224
Need help on: How to shut down another computer in the same network.
Last edited by MayronWoW; 2011-09-24 at 02:40 PM.
-
2011-09-24, 02:27 PM #2Brewmaster

- Join Date
- May 2010
- Posts
- 1,279
I don't know how to solve your problem, but it does remind me of a time in like 9th grade where I kept shutting down our computer lab repeatedly and we couldn't start our stupid project that day, they figured out it was me and I got a 10 day suspension from school and I still can't use computers there.
Edit: Actually I believe the computers have to both be wired to the same domain, not just the same router.Last edited by Coar; 2011-09-24 at 02:30 PM.
-
2011-09-24, 02:29 PM #3Mechagnome

- Join Date
- Jun 2010
- Posts
- 530
Try using teamviewer instead of using the command prompt. It is a program that enable you to control another computer including shutting it down

-
2011-09-24, 02:39 PM #4The Patient
- Join Date
- Mar 2011
- Posts
- 224
Thanks but not sure how to go about doing this. Originally Posted by Coar

Also I wouldn't want to try to use TeamViewer as I've been using command prompt for a while now and use it for other stuff too so It feels better for me but I know you can do it with it, just getting these silly problems :S
-
2011-09-24, 02:42 PM #5Deleted
Can u ping other computer?
-
2011-09-24, 02:44 PM #6The Patient
- Join Date
- Mar 2011
- Posts
- 224
I tried doing that with net view but it only comes up with "There are no entries in the list" so it cannot detect the other computer. Am I doing it wrong? :S
I tried opening up cmd again and typed:
ping "ip address here"
and came up saying it sent 4 packets and recieved 4
Not sure if that is was a ping is as I've never done one before.Last edited by MayronWoW; 2011-09-24 at 02:48 PM.
-
2011-09-24, 02:55 PM #7Scarab Lord

- Join Date
- Oct 2007
- Location
- Comox Valley, BC
- Posts
- 4,431
Have you at least set up the computers in the same homegroup for file sharing?
-
2011-09-24, 02:58 PM #8I am Murloc!

- Join Date
- Feb 2011
- Location
- Colorado
- Posts
- 5,553
i thought remote shutdown needed AD not homegroup Originally Posted by Culadin
-
2011-09-24, 02:59 PM #9Herald of the Titans

- Join Date
- Dec 2008
- Posts
- 2,695
EVGA Classified SR-2 | Intel Xeon X5680 x 2 | Corsair Dominator DDR3-1600 6 x 2GB | XFX HD5970 x 2
Intel PRO/1000 PT Server NIC | ASUS Xonar DX | Corsair AX1200 | Corsair TX750OCZ Vertex2 60GB | WD Velociraptor 300GB x 2 | Samsung Spinpoint MP4 500GBEK-FB SR2 - Acetal+Nickel | EK-Supreme HF - Acetal x 2 | EK-FC5970 Acetal x 2
Thermochill TA120.4 x 3 | Thermochill TA120.3 | Swiftech MCP655 x 2
-
2011-09-24, 02:59 PM #10The Patient
- Join Date
- Mar 2011
- Posts
- 224
Yep I have done that but the windows vista PC hasn't got that. Can only find the home group settings with windows 7 :S Originally Posted by Culadin
-
2011-09-24, 02:59 PM #11Herald of the Titans
- Join Date
- Dec 2008
- Posts
- 2,695
It needs admin rights and if the system you're shutting down is a Home version, settings need to be changed. Originally Posted by Cyanotical
EVGA Classified SR-2 | Intel Xeon X5680 x 2 | Corsair Dominator DDR3-1600 6 x 2GB | XFX HD5970 x 2
Intel PRO/1000 PT Server NIC | ASUS Xonar DX | Corsair AX1200 | Corsair TX750OCZ Vertex2 60GB | WD Velociraptor 300GB x 2 | Samsung Spinpoint MP4 500GBEK-FB SR2 - Acetal+Nickel | EK-Supreme HF - Acetal x 2 | EK-FC5970 Acetal x 2
Thermochill TA120.4 x 3 | Thermochill TA120.3 | Swiftech MCP655 x 2
-
2011-09-24, 03:05 PM #12The Patient
- Join Date
- Mar 2011
- Posts
- 224
It is a home version. I've been playing around with the settings, trying to find which ones need to be changed but having no luck. Originally Posted by ispano
-
2011-09-24, 04:15 PM #13Scarab Lord
- Join Date
- Oct 2007
- Location
- Comox Valley, BC
- Posts
- 4,431
Lets try this.
My theory is that by networking the computers in a workgroup we should be able to then view / access the Vista computer via the network. At which point, in theory, we should be able to do the command prompt shutdown. You may need to run the command prompt in administrator mode also.Ensure that File and Printer Sharing Is Enabled
Although Windows automatically installs and enables the protocol for file and printer sharing, it can be accidentally disabled. Thus you should double-check it, especially if you're currently having sharing problems.
On the network connection's properties dialog (see Figure 1) you want to make sure the File and Printer Sharing for Microsoft Networks and Client for Microsoft Networks protocols are enabled.
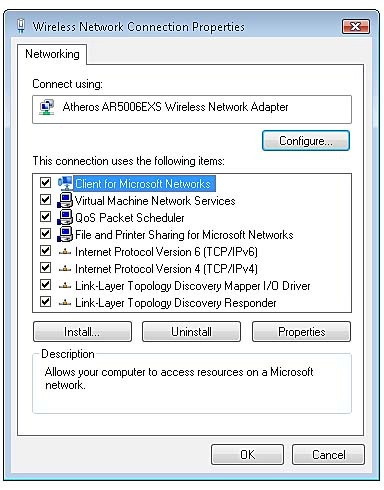
Figure 1
To get to the Properties dialog of a network connection in XP, click Start > Connect to> Show all connections. Then right-click the network connection you're using and select Properties.
Here's how to get there in Vista: open the Network and Sharing Center and click the Manage network connections link on the left pane. Then right-click the network connection and select Properties.
In Windows 7, open the Network and Sharing Center, click the desired connection name link in the active networks area. On the connection status windows, click the Properties button.
Disable the Simple or Wizard File-Sharing Interface
Windows XP Professional and all editions of Vista and Windows 7 have advanced sharing settings. When you use the advanced method, you can better control sharing using Permissions.
You'll be using a similar approach among your computers, regardless of their Windows version.
Here's how to disable the simple or wizard-based sharing interface:
Open Computer or My Computer.
Click Tools and select Folder Options.
If you don't see the file menu in Vista or Windows 7, press the Alt key.
Click the View tab.
Scroll down and uncheck Use Sharing Wizard (in Vista or Windows 7) or Use Simple File Sharing (in XP).
Click OK to save the changes.
Verify that Everyone Is on the Same Workgroup
On home and small business networks, computers must be assigned to a Workgroup. You should have all the computers that you want to share with each other set to the same group.
Because some Windows versions have different default workgroup names, you should decide on a particular name and verify that each computer is set to the same.
To find the current Workgroup of a Windows XP, Vista, or Windows 7 machine, right-click the My Computer or Computer shortcut from the desktop or start menu and select Properties. You'll see the computer name, domain, and workgroup setting on the System window.
While you're at it, you can also verify that you have descriptive computer names, so you can tell which PC is which when you browse the network.
Check the Network Location in Vista and Windows 7
A network location feature, which debuted in Windows Vista, lets you specify the network type (Home, Work, and Public) after connecting, which automatically applies the appropriate sharing settings.
For example, if you connect to a Wi-Fi hotspot and mark it as a Public network, Windows will automatically disable file sharing.
To verify that you have the right network location selected for your network, bring up the Network and Sharing Center.
Windows Vista lists this to the right of the network name, as Figure 2 shows.
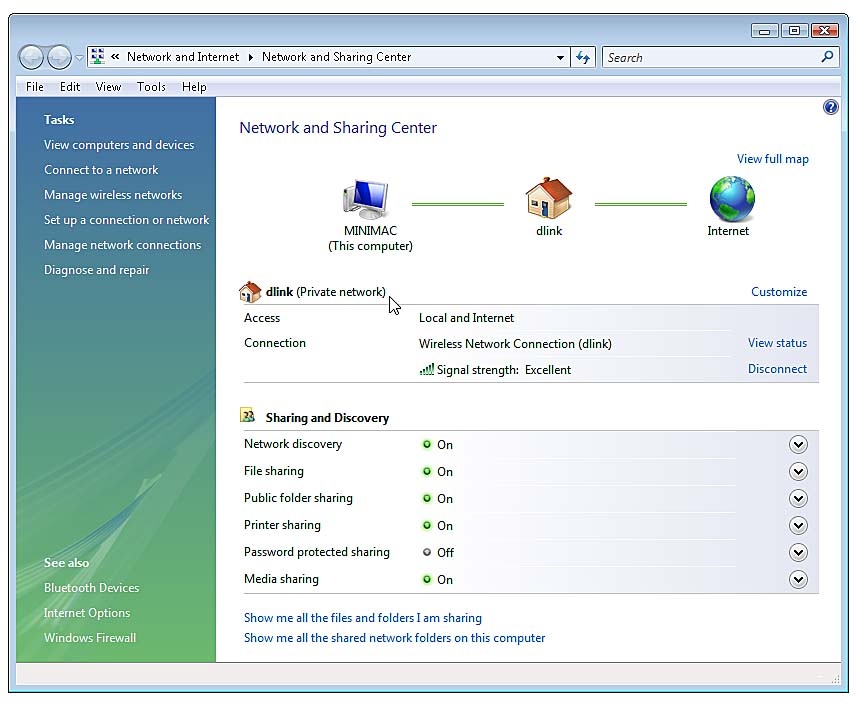
Figure 2
If you need to change it, click the Customize link on the right side.
In Windows 7, the location is listed under the network name, as Figure 3 shows.
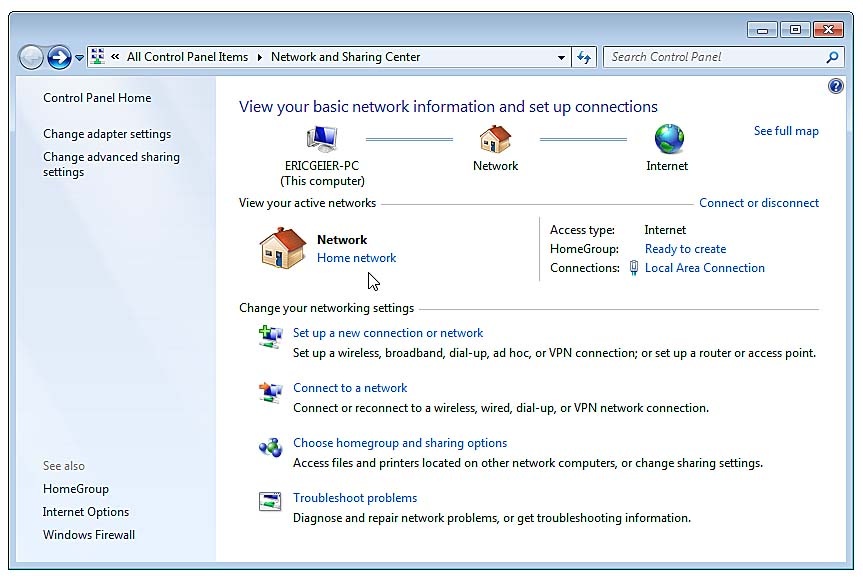
Figure 3
Then simply click the location to change it.
Review the Network Settings in Vista and Windows 7
Microsoft also added more networking and sharing settings to Windows, starting with Vista. If they aren't set right, they could prevent you from sharing; so you need to double-check them.
Start by bringing up the Network and Sharing Center.
In Vista, you'll see the Sharing and Discovery settings right under the connection details, as Figure 4 shows.

Figure 4
If you want to sharing files, make sure at least the first options are enabled.
In Windows 7, these settings have moved. On the Network and Sharing Center, click the Change advanced sharing settings link in the left pane.
Then for the Home or Work location (see Figure 5), make sure you at least have the first two options enabled.

Figure 5
Verify that Your Firewall Lets Traffic Through
Windows automatically edits the Windows Firewall settings to allow file and printer sharing traffic through when you enable sharing.
However, you can manually disable the firewall rule or stop all network traffic, both of which would prevent your computers from communicating. So you should double-check the settings.
In Windows XP, open Windows Firewall from the Control Panel. On the Windows Firewall dialog, make sure it's On, but do not check the Don't allow exceptions option.
Click the Exceptions tab, scroll down, find the File and Printer Sharing option, and make sure it's checked.
In Windows 7 and Vista, first open the Network and Sharing Center and click the Windows Firewall link on the bottom of the left pane.
Then in Vista, click the Change settings link on the first Windows Firewall window. On the settings dialog, make sure it's On, but do not check the Block all incoming connections option.
Click the Exceptions tab, scroll down, find the File and Printer Sharing option, and make sure it's checked.
In Windows 7, first click the Turn Windows Firewall on or off link to make sure it's on but not blocking all incoming connections, as Figure 6 shows.
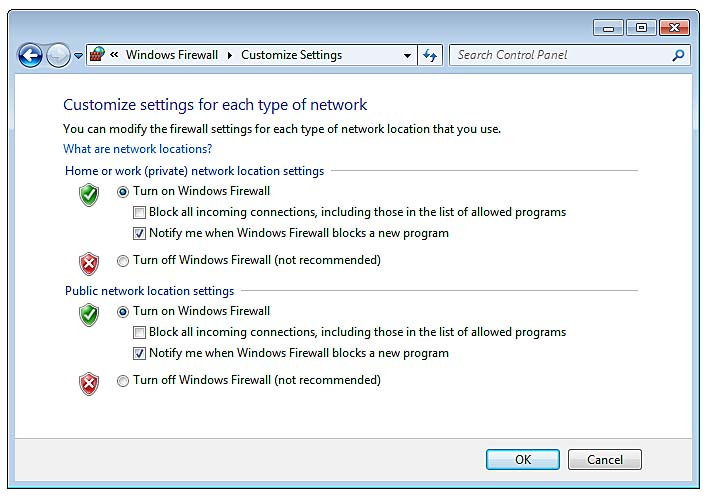
Figure 6
Return to the first Windows Firewall window and click the Allow a program or feature through Windows Firewall link in the upper left of the window.
Make sure that the File and Printer Sharing option is checked for Home/Work locations.
If you also have a third-party firewall utility installed, which may be a part of an Internet security suite, check that one, too. Sometimes they have their networking protect features. For example, some require you to mark the network as safe in order for sharing to work.
Source
-
2011-09-24, 07:31 PM #14The Patient
- Join Date
- Mar 2011
- Posts
- 224
Thank you so much, I will try it very soon
-
2011-09-27, 09:03 PM #15The Patient
- Join Date
- Mar 2011
- Posts
- 224
Unfortunately, I've tried and managed to do every single thing you mentioned however it constantly says access is denied when i try it. I dont understnad it. I think I'm going to give up trying because I cant find any setting which I can think of which would solve this issue.
-
2011-09-27, 09:06 PM #16Herald of the Titans
- Join Date
- Dec 2008
- Posts
- 2,695
You DID look at the link I provided in my first reply, right? It's not a setting you can find and change yourself.
EVGA Classified SR-2 | Intel Xeon X5680 x 2 | Corsair Dominator DDR3-1600 6 x 2GB | XFX HD5970 x 2
Intel PRO/1000 PT Server NIC | ASUS Xonar DX | Corsair AX1200 | Corsair TX750OCZ Vertex2 60GB | WD Velociraptor 300GB x 2 | Samsung Spinpoint MP4 500GBEK-FB SR2 - Acetal+Nickel | EK-Supreme HF - Acetal x 2 | EK-FC5970 Acetal x 2
Thermochill TA120.4 x 3 | Thermochill TA120.3 | Swiftech MCP655 x 2
-
2011-09-28, 06:55 PM #17The Patient
- Join Date
- Mar 2011
- Posts
- 224
Oh that worked lol sorry. Didn't think you'd have to download something for it to work, thats a shame

Thank you so much!
-
2011-09-28, 07:36 PM #18The Lightbringer

- Join Date
- Aug 2008
- Location
- This side of an imaginary line in the sand
- Posts
- 3,741
Not necessarily. You can use psexec powertool to remotely run the cmd command shutdown -s -t 0 with an admin account on the target computer. Originally Posted by Cyanotical
Active Directory is only needed if you want to use a domain admin account to shutdown a member computer remotely with just shutdown -s -t 0.red panda red panda red panda!

 Reply With Quote

